The Setting
Part 1. Before Citrix
I initiated and helped facilitate move from Sketch to Figma for the whole Product Design organisation at Citrix. But this was not my first adventure of this kind. Before I joined Citrix, I was part of the design team at CA Technologies, where I also played a major role in transition to Figma from Sketch. Whole process in that case was quite smooth - we had an open tooling policy, where designers were free to use any tool of their choice, as long as them and their product teams were happy. Among few other colleagues, I wanted our team to be better aligned and collaborate more productively, hence Figma became my tool of choice. To introduce Figma to my design partners, I chose the tactics to lead by example - I started to use Figma myself. Moreover, I did a number of demos and knowledge sharing sessions, where I showed how Figma can help designers be more productive and align better. Those who wanted to give it a try were not left alone - I helped with onboarding and shared tips and best practices on how to master Figma.
Part 2. At Citrix
Same thing. Higher difficulty. Joining Product Design at Citrix in 2019 I found myself in Sketch realm. Work happened locally, then was uploaded to Abstract, collaboration was slow and cumbersome, it was time for a change. But switching to Figma was not that easy in this case. Tools at Citrix were standardised, there was no open tooling policy. On top of that, most of the design work at Citrix was highly interdependent, teams and designers collaborated, and library and system design changes spanned across product areas and products. Product Design organisation size also did not make the case look easier - together with Program Management and Design Management it counted more than 60 people. Lastly, transitioning to a new tool also meant dealing with a massive repository of previously created design deliverables. With these points in mind, I found it impossible to implement Figma process in one of the teams, experiment, improve, document, and serve an example for the rest of the Product Design.
The Problem(s)
Problem 1. Buy-in
Since at Citrix designers were not free to choose the tools of their liking, in order to introduce Figma to the Product Design successfully, I needed to ensure buy-in from the ICs, as well as get support from management for the initiative. To get ICs on board with the idea, I did a round of demos and knowledge sharing sessions, showing the benefits of Figma for our daily tasks and collaboration. Management's buy-in, on the other hand, had to be gained in a more strategic manner - I helped conduct comparative analysis for feature set and design lifecycle for current tooling setup versus the proposed one. Sharing success stories and best practices from other companies, who successfully switched to Figma, also helped me to build my case.
Problem 2. Alignment
New tooling was meant to help the Product Design organisation of 60 to be more productive, and, most importantly, to align better. To achieve this, I needed to design the design process around Figma. This process had to be balanced - on one hand it had to be uniformal enough, so that designers from different teams and product areas could cooperate with minimal friction, on the other hand the process had to be flexible enough, for the smaller teams to define their local best practices that help them be efficient.
The Action Plan
After the future switch to Figma was ensured, my main task became to design “How we Figma” guidelines for the whole Product Design. Meanwhile, the team got the trial access enabled, and to provide early assistance I created Figma support Slack channel.
Step 1. Collecting the Knowledge
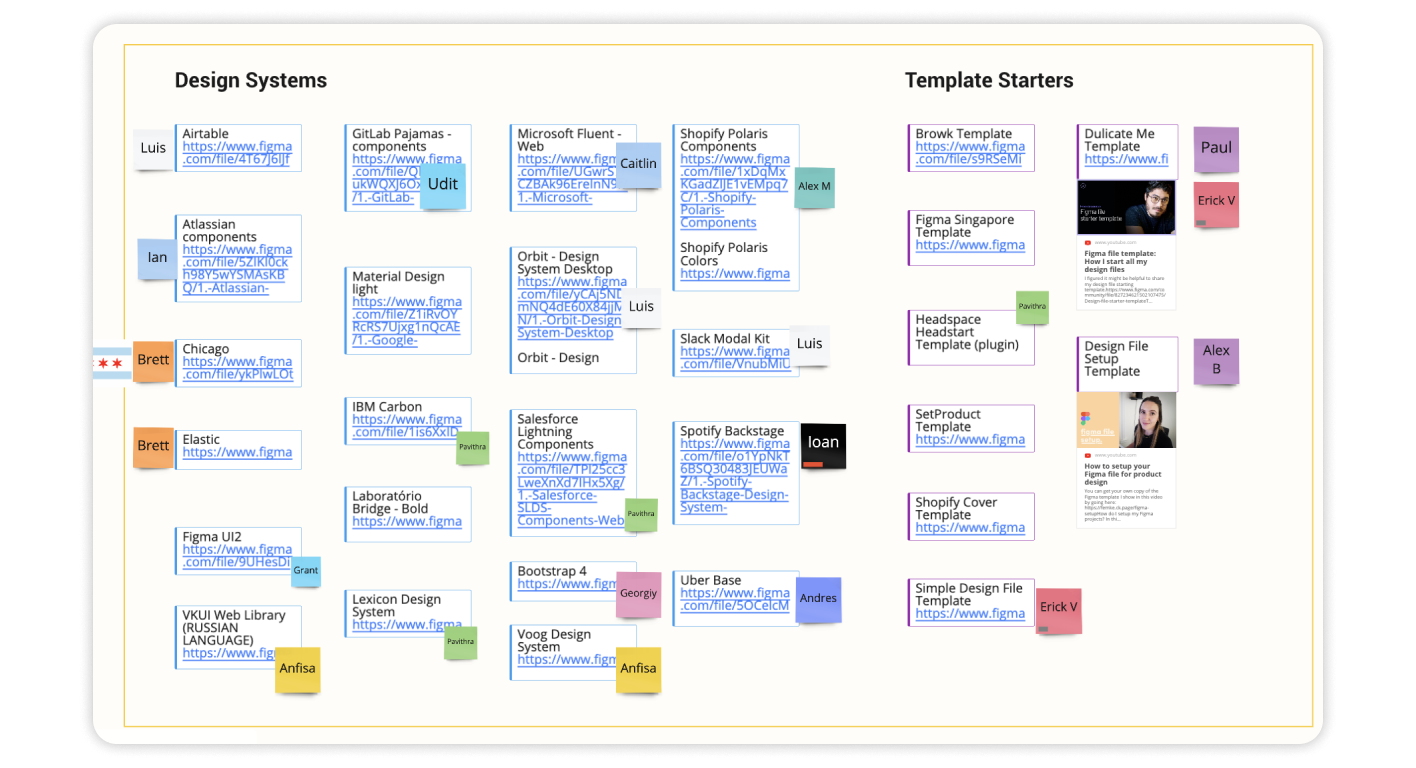
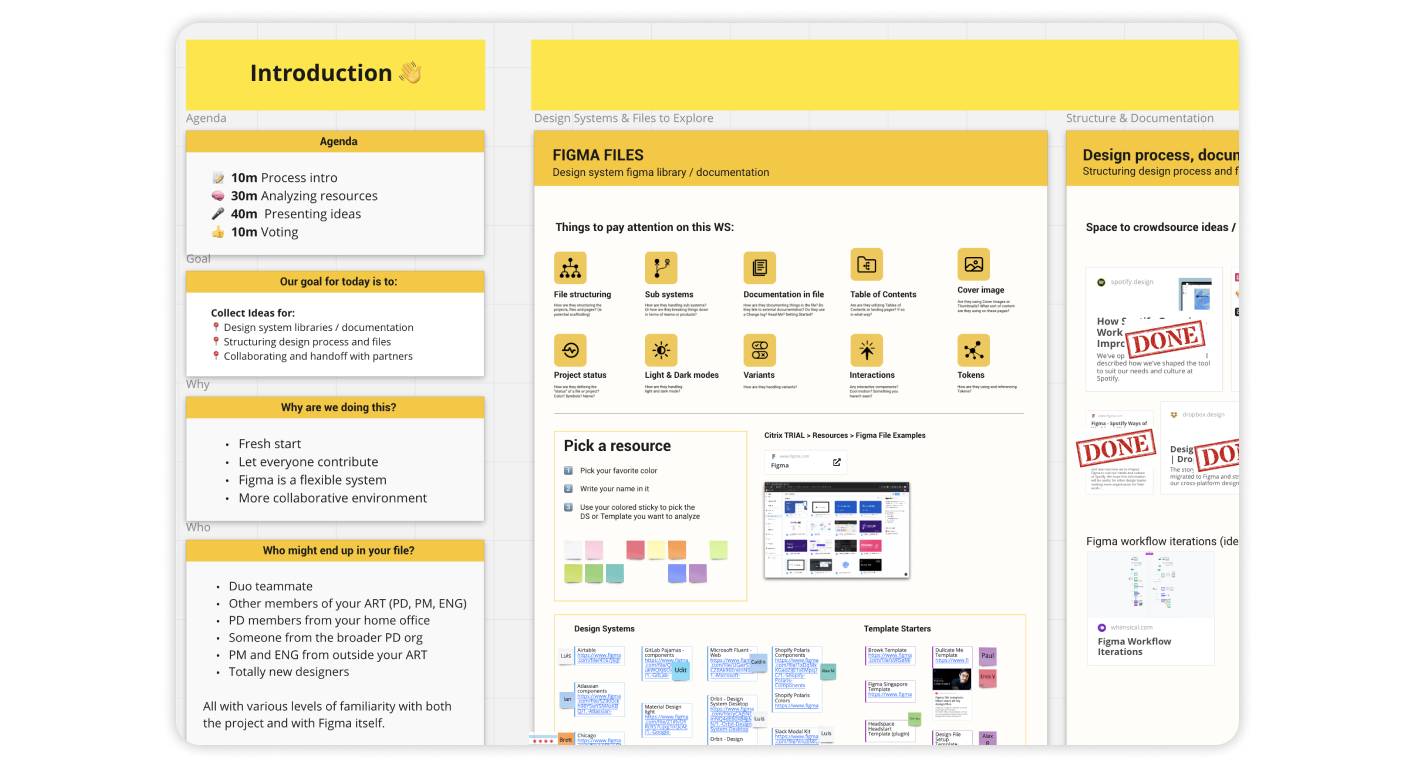
Together with a small project group of Figma enthusiasts we started to research and document the information that could help us with this project. We searched for materials outside of Citrix, such as articles and presentations by other design teams, file examples in Figma Community. Collecting this information helped us create a broad overview of design processes built around Figma in other companies. We also documented existing workflows that our teams followed, to build a better understanding of current design habits at Citrix and also identify problems we would need to solve.
Step 2. Include All Perspectives
This project was essentially done "by designers for designers", so it was critical to include as many perspectives as possible, in order not to miss any needs of our colleagues. Having the materials collected in the previous step, our project group held a global workshop for the whole Product Design org. Goal of this workshop was to analyse collected materials, files, articles, and existing workflows, as well as to ideate on suggestions for the future guidelines. During the workshop, Product Design team members picked certain materials for the review, and left their notes, observations, and suggestions in a shared workshop Miro board. In the result, after the workshop was completed, our project group obtained a massive library of inputs from both designers and design managers.
Step 3. First Designs
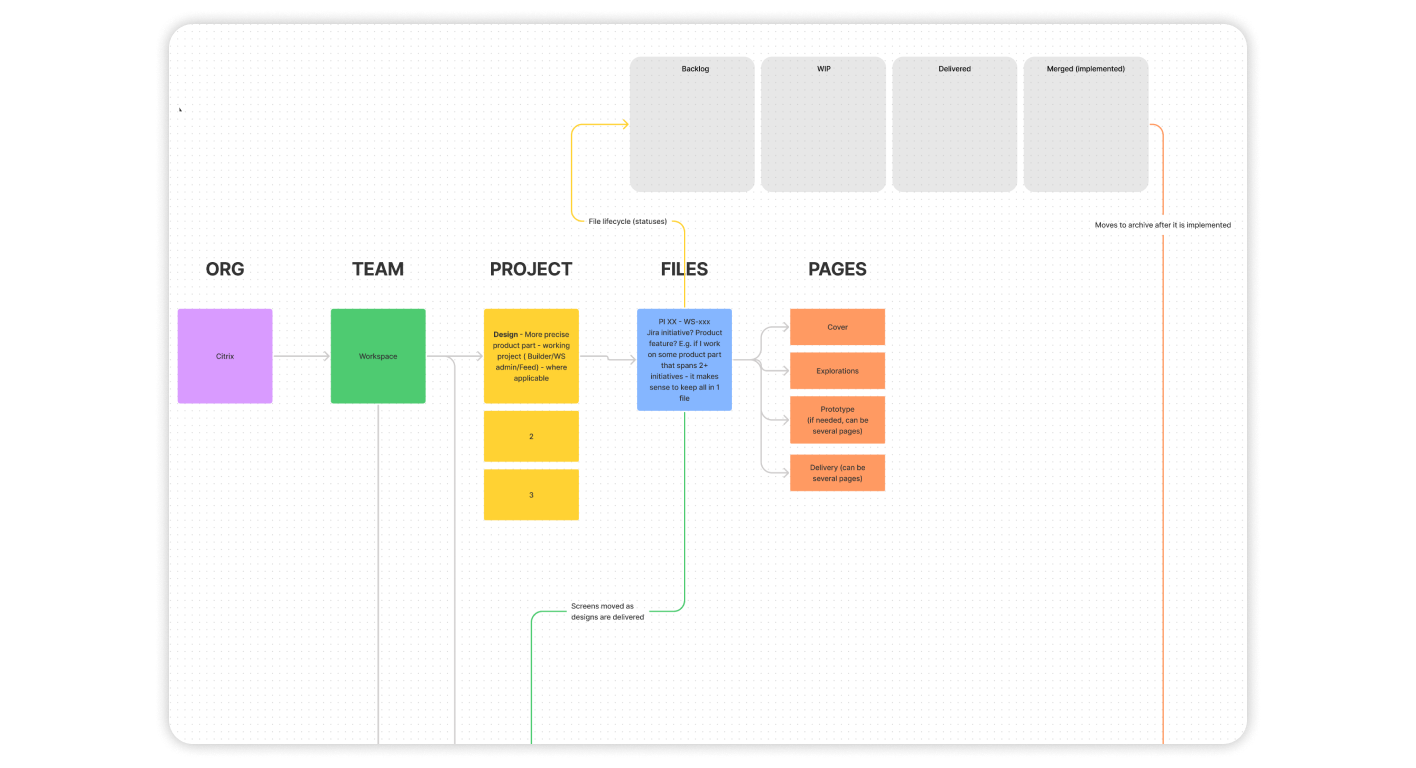
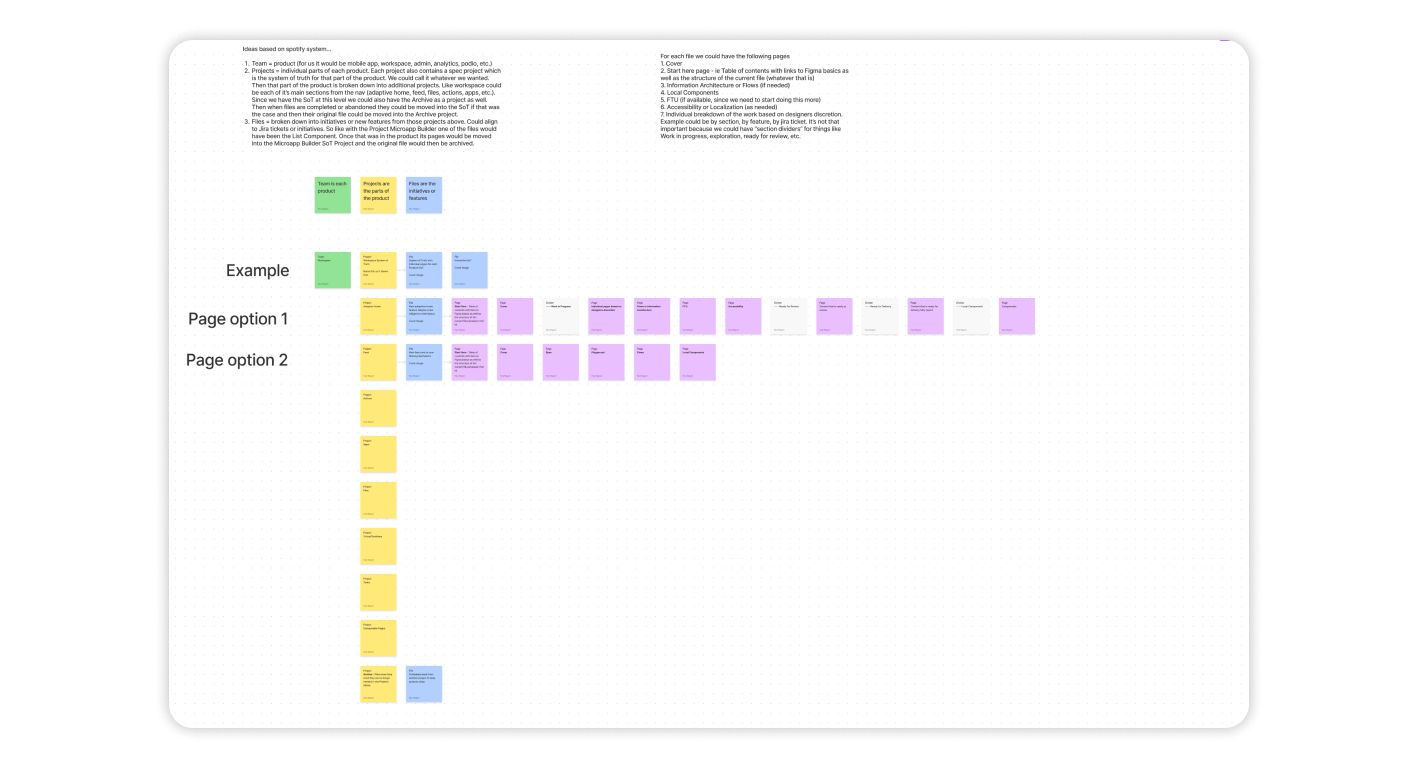
Our small project group, working on “How we Figma” guidelines, consisted of Product Designers from different product teams. Combined with global workshop that we held previously, this ensured adequate representation. Our main task here was to process the results of the workshop. We created first drafts of of work process, that included guidelines for Figma use, file and project structure, design file lifecycle. In the same time we started to draft the needs for the supporting deliverables such as Figma libraries and templates, that will set our Product Design team for success.
Step 4. Growing the Team
As we moved forward with our explorations we started to grow the project team. First, we invited more designers, who volunteered to contribute to the project. This allowed us to explore more perspectives in greater detail. In this phase we also started to validate the ideas that we had by doing test runs of the workflow proposals with designers. We also held a round of sessions with Design Leads from different product areas, to collect opinions and feedback on a higher level of work organisation.
Step 5. The Final Guidelines
The final version of “How we Figma” guidelines covered full Figma design process:
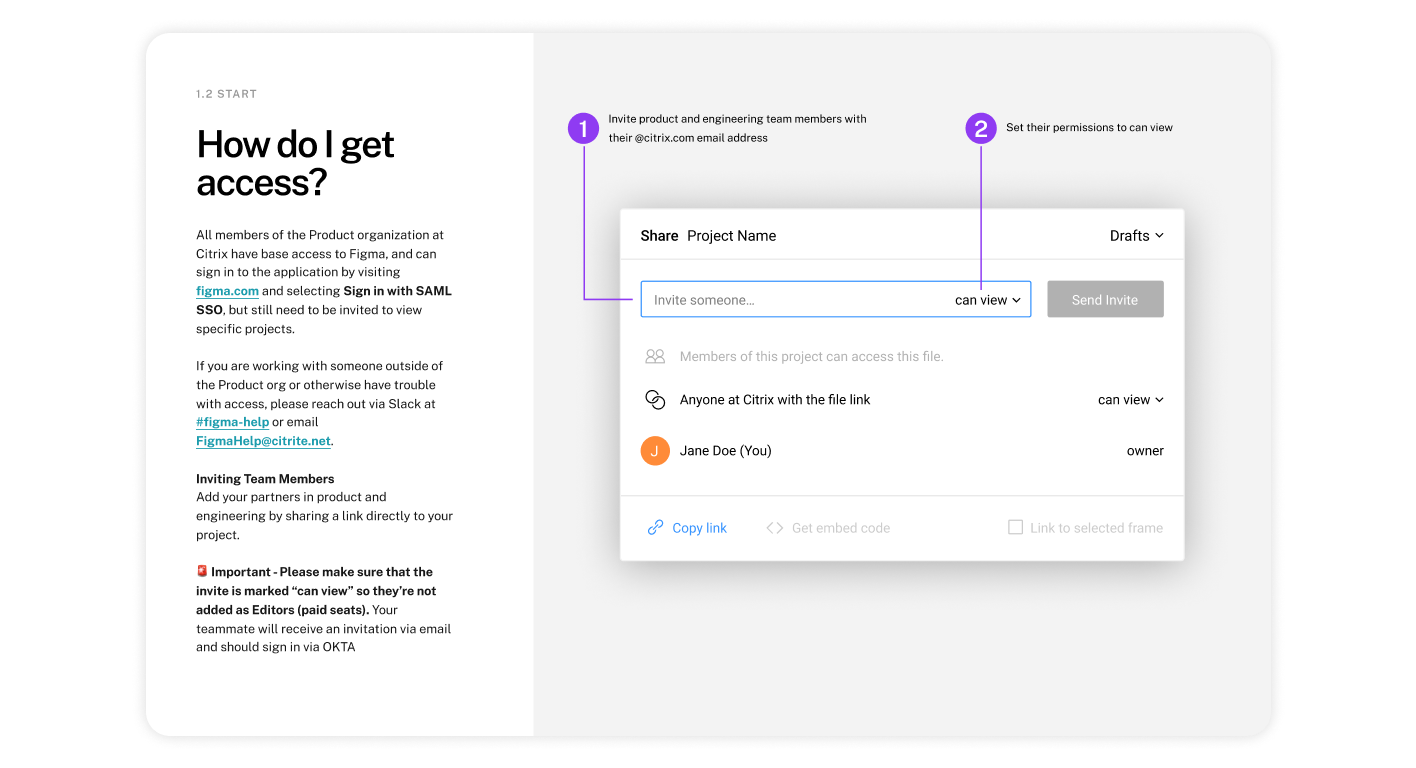
- How to get access to Figma
- How to collaborate
- How to organise teams, projects, files
- What is the design file lifecycle
- How to use libraries and plugins
I was responsible for creation of final content of the guidelines, as well as implementing them on a sample Figma project. The biggest challenge, as well as the largest part of the guidelines, was about structure of Figma teams and design process. It was not an easy task to propose a solution that would not simply copy structures of existing product teams and processes, but improve those, leveraging capabilities of Figma.
Supporting Deliverables
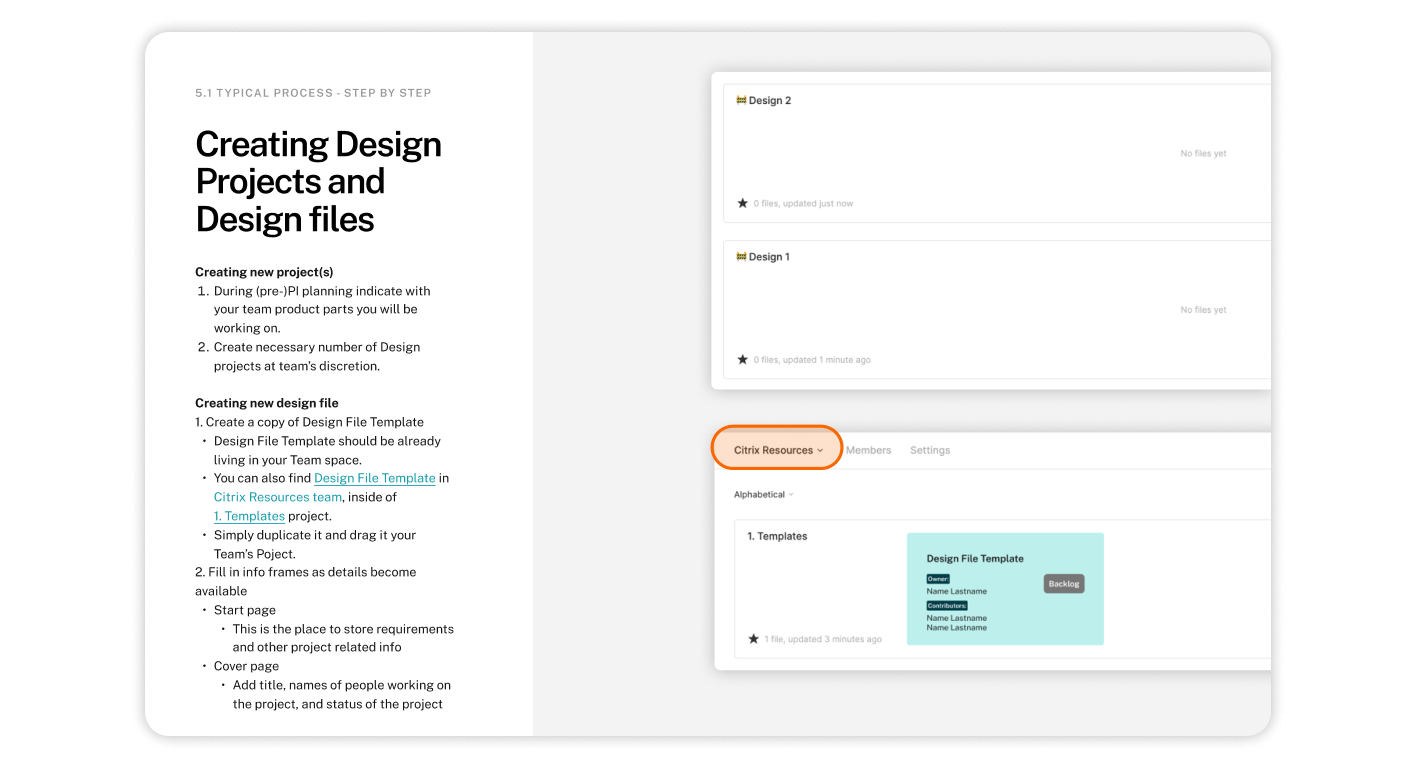
Another big part of my responsibilities in this project was creation of internal Figma resources for the design team to use. Firstly, I had to create a sample Figma team, which was organised according to the created guidelines. For this purpose I set up DesignOPS Figma team, and followed newly designed structure and processes in my work there. Next, I created internal knowledge base in Figma, where team members could share useful resources, for example the very “How we Figma” guidelines were shared there. As for the work resources, I also created a design file template, that the any team member could use to quickly kick-off a design project of any scale.
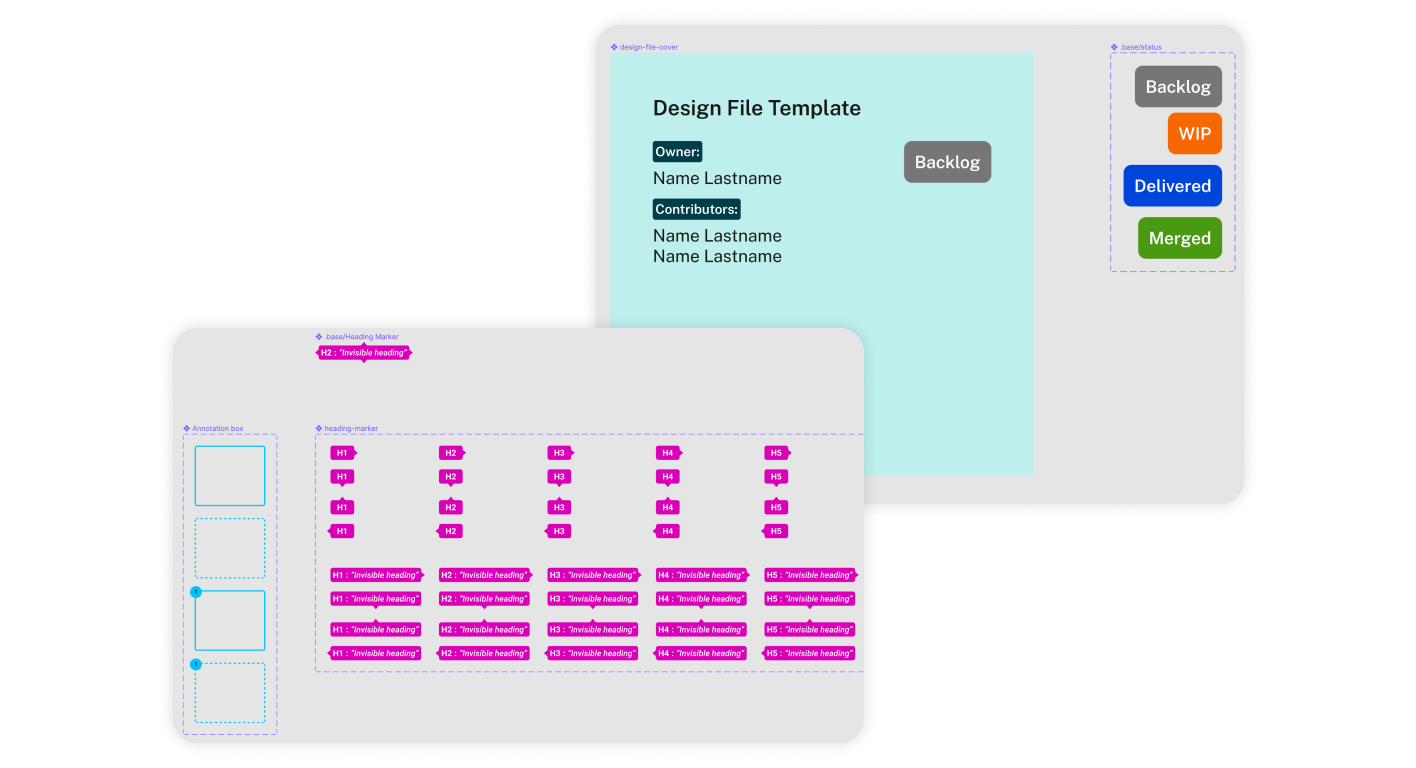
In order to centralise the resources even more, and make it accessible to every team member by default, I worked on several Figma libraries:
- File Setup Library - it contained components used in design file template
- Library Setup Library - standardised components for setup of Figma library of our design system components
- Design Annotation Library - a set of components for design annotation
- Design Checklists Library - accessibility and localisation checklists for all designers to work with.
To help my teammates even more and save even more of their time I developed a custom Figma plugin, which helped add annotations to designs in Figma with only few clicks.
The Rollout
To ensure that the “How we Figma” guidelines are not only properly introduced to the Product Design org, but also adopted, we planned two rounds of Roadshow for the smaller region-based groups of designers. First round was held in a format of presentation, where I had chance to talk about the guidelines in detail. Second round, on the other hand, was more focused on implementation - we usually held a Q&A session, followed by discussion of practical tips on the guidelines as well as Figma in general.
After the Roadshow we've continued to provide support to the design team, creating a Slack channel and a mailbox for Figma troubleshooting and questions. Also I've continued to act as Figma coach in the team, constantly consulting designers on best practices and guidelines implementation.
The Results
Only one month after the guidelines were introduced to the Product Design organisation of 60 people, 50% of the design teams adopted and implemented the guidelines in their Figma spaces.